
Connect your Computer to your Stereo Receiver or Home Theater system, cassette deck or turntable. It's usually not so hard!

People were connecting their computers to their larger general Audio/Video systems long before Netflix and Hulu and all the other online content came streaming into your home over broadband Internet connections. Nowadays there is so much "content" out there to be had it is hard to believe you should have to pay for any of it! But size still matters. Why watch something on that little laptop when I have this big TV?! And once you get the video on the big screen you have to supersize the audio as well. Then again, sometimes you just want to listen to some music. Spotify, Pandora, iTunes, plus a zillion online radio stations? While there is a lot of video on the web, the Music is almost unlimited!

The "In's and Out's":
Home audio amplifiers are pretty standardized as far as input and output levels. This includes "Integrated" Amplifiers (Preamp and power amp combined in a single chassis), as well as Receivers - both stereo and surround sound.
Stereo amplifiers and receivers have two analog RCA jack connectors for input for each device. All of these except the "phono" inputs are at standard consumer "Line" levels.
Surround sound receivers generally have other types of inputs (digital) and outputs that you normally will not find on stereo receivers/amplifiers. Surround sound amps and receivers have all of their analog inputs and outputs (except phono) at this same level. You can use any of these: Aux, Tape, Tuner, CD, etc for connecting your computers Line level or Headphone level output. Line level should be the preference if available. You may need to turn down the headphone outpput level a bit if the audio sounds distorted. Remember to go from output to input.
"Power" Amplifiers are another story. Home audio power amplifiers also have "Line" level inputs, but they have very little in the way of volume and tone controls and switching. They simply amplify the signal. These are not recommended for connecting to your computer.
How to Wire it: Computer OUT to stereo IN
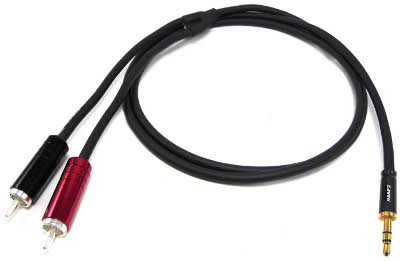
The easiest way to connect the audio output of your computer is to use the "line" output of your sound card. We recommend a stereo 3.5mm mini phone plug to dual RCA cable or mini plug to dual RCA jack adapter with a RCA jack stereo cable to go to the audio input of your sound system, such as the "aux" input. The longer the length of the cable run, the more the quality of the cable will effect sound quality. Specifically, the lower the capacitance per foot of the cable, the less high frequency loss there will be.
Reverse Wired - Stereo OUT to Computer IN:
You can use the same cabling options to go the other way. For instance, if you want to record the radio or music on your records and save it as digital music, such as an mp3, you may want to connect your stereo receiver/tuner/turntable to your computer in order to "record" the music to your computer’s hard drive. You can then edit the audio files and playback music directly from your computer; and, even better, convert the files to wav, lossless or MP3's with the appropriate software for subsequent transfer to mobile devices.
To accomplish this, you need to connect the audio input of your computer to the audio output of your stereo receiver. We recommend a 3.5mm mini phone plug to Rca jack adapter with a RCA jack stereo cable which plugs into the "line" or "mic" input of your computer’s sound card. If it's a "mic" input you may have to tweak the levels down, since mics usually have a very low output. You then connect the RCA jack stereo ends to the main audio output of your stereo receiver, if it has one, or to a routable output such as one of the "tape" output jacks. Many audio systems have tape ins and outs so you can connect up your computer through these to use it as a tape recorder as well as a sound source.
Home audio amplifiers are pretty standardized as far as input and output levels. This includes "Integrated" Amplifiers (Preamp and power amp combined in a single chassis), as well as Receivers - both stereo and surround sound.
Stereo amplifiers and receivers have two analog RCA jack connectors for input for each device. All of these except the "phono" inputs are at standard consumer "Line" levels.
Surround sound receivers generally have other types of inputs (digital) and outputs that you normally will not find on stereo receivers/amplifiers. Surround sound amps and receivers have all of their analog inputs and outputs (except phono) at this same level. You can use any of these: Aux, Tape, Tuner, CD, etc for connecting your computers Line level or Headphone level output. Line level should be the preference if available. You may need to turn down the headphone outpput level a bit if the audio sounds distorted. Remember to go from output to input.
"Power" Amplifiers are another story. Home audio power amplifiers also have "Line" level inputs, but they have very little in the way of volume and tone controls and switching. They simply amplify the signal. These are not recommended for connecting to your computer.
How to Wire it: Computer OUT to stereo IN
The easiest way to connect the audio output of your computer is to use the "line" output of your sound card. We recommend a stereo 3.5mm mini phone plug to dual RCA cable or mini plug to dual RCA jack adapter with a RCA jack stereo cable to go to the audio input of your sound system, such as the "aux" input. The longer the length of the cable run, the more the quality of the cable will effect sound quality. Specifically, the lower the capacitance per foot of the cable, the less high frequency loss there will be.
Reverse Wired - Stereo OUT to Computer IN:
You can use the same cabling options to go the other way. For instance, if you want to record the radio or music on your records and save it as digital music, such as an mp3, you may want to connect your stereo receiver/tuner/turntable to your computer in order to "record" the music to your computer’s hard drive. You can then edit the audio files and playback music directly from your computer; and, even better, convert the files to wav, lossless or MP3's with the appropriate software for subsequent transfer to mobile devices.
To accomplish this, you need to connect the audio input of your computer to the audio output of your stereo receiver. We recommend a 3.5mm mini phone plug to Rca jack adapter with a RCA jack stereo cable which plugs into the "line" or "mic" input of your computer’s sound card. If it's a "mic" input you may have to tweak the levels down, since mics usually have a very low output. You then connect the RCA jack stereo ends to the main audio output of your stereo receiver, if it has one, or to a routable output such as one of the "tape" output jacks. Many audio systems have tape ins and outs so you can connect up your computer through these to use it as a tape recorder as well as a sound source.

Example Connection:
3.5mm (1/8") Stereo mini plug to dual RCA cable
3.5mm (1/8") Stereo mini plug to dual RCA cable
HOME AUDIO CONNECTIONS: TAPE DECKS/CD PLAYERS

Cassette Tape Deck
Many of us have old cassette tapes or other ancient audio sources that we want to preserve or combine to create custom playlists. Computer recording software is perfect for this purpose. Assuming your computer is loaded with the appropriate computer recording software, you will need to connect the audio input of your computer to the audio output of your tape deck or cd player. We recommend a 3.5mm mini phone plug to Rca jack adapter with a RCA jack stereo cable which plugs into the "line" input of your computer’s sound card. You then connect the RCA jack stereo ends to the audio output of your tape deck or cd player, such as one of the "tape" output jacks.
Example Connection:
3.5mm (1/8") Stereo mini plug to dual RCA cable
CASSETTE DECKS FOR ARCHIVING CASSETTE TAPES
Getting a good cassette deck in late 2013 is clearly half the battle to doing some cassette tape archiving. Yes, you can still buy them new, but in this case it's worse than buying a car, once you leave the showroom, they are worth a fraction of what you just paid. Buying online used decks from eBay is also very tricky, and if you are not careful you can waste a lot of money! First - never buy an "as is" cassette deck. These things are outlived by fruit flies. The person who put it up probably tested it for a total of five minutes and it will certainly start eating tapes after 15 minutes of use - just when you thought it was ok and put in your priceless recording of Uncle Ralph singing "My Way".
Don't be fooled by recognizable brands unless they are studio tough brands like Tascam or Nakamichi. Even these you need to be skeptical about. Cassette decks are all about rubber belts, rubber wheels, "heads" that wear out and buttons that wear out. If you can't get a 30 day guaranty, at least get a promise that it will work for a week. Don't rush, one will come along at a good price. There are just not that many people dying to buy 20 year-old technology! You can buy serious studio quality cassette decks that sold for over $1000 for incredibly low prices if you are patient enough. The added benefit of paying more for a studio quality deck is that you should have no trouble selling it later. Schools, Universities and Professional audio Archivists continually find new recordings that are worthy of digitizing, so a top notch Deck like a Nakamichi Dragon or a Tascam 122 Mk III is not going to lose you much money, if any in a future sale. Just get it cheap and guaranteed!
Finally, don't expect miracles. That tape you spilled champagne on in the limo to the prom is not going to work in ANY cassette player! Even if in normal condition, some of those old tapes may be so degraded that only a professional archivist can safely get the sound off of the tape. Have you ever tried to put a tape into a new shell? Trust me, surgeons don't want that kind of ordeal. At times they have to go to extreme measures which you and I are not just too lazy or uncoordinated enough to do, but also, not educated enough in the weird skill set required, to do. Professional Audio archiving is a weird science requiring mechanics, chemistry, computer, math and manual dexterity skills. So if you have content that is really critical, you should at least consult a pro for pricing. Of course, uncle Ralph singing "Like a Virgin" in drag may be a hilarious memory, but it may not be worth the price of a professional archiving job.
Assuming you have the software you need, the first thing to do is check the buttons, switches and connections and get the deck ready to work with your sound card. For prerecorded tapes you usually set to Dolby B, and MPX filter off. When recording from the radio you should turn on the mpx filter. If you are using home recorded tapes that are Metal or CrO2 you should change that setting appropriately. The Cassette decks output should go to the sound cards "Line" input (usually color coded green) not the Mic input. Most sound cards have stereo mini phone plug (typical 1/8" 3.5mm stereo headphone jacks on mp3 players) inputs and outputs. So, an adapter or cable with RCA to mini plug connectors will be necessary.
The second thing to do in the recording setup process is to set up the tape deck output and sound card input so you have the maximum volume coming from the tape deck possible without overloading the input of the sound card or other audio interface. On commercial tapes you generally don't have to worry about the cassette decks output level as much as with self recorded tapes, so you can often just just crank it up to maximum. This is certainly not true of all tapes, so be careful, monitor your levels and adjust.
The reason for getting the maximum output level is that you want the lowest noise level possible on your digital recording. Cassette tapes (or reel to reel for that matter) have limited signal to noise ratios compared to a good sound card. On the other hand, you don't want to crank things up too high to lower your noise "floor" at the expense of dynamic compression and distortion. Raising the noise floor may give you a bit more "hiss" between songs, but that is usually pretty easy to eliminate using software on the computer. Eliminating distortion on the other hand, is extremely difficult if not impossible. There is Pro level software that can do a reasonably good job of it, but it is very expensive, and no software like this is ever perfect. On self recorded tapes, you need to make sure the output is not too hot. You should be able to determine overloaded output from the meters. Occasional momentary peaks just barely going into the red is often acceptable. Use your ears as your guide to some extent here, but don't bet your time on them. Finding out you have some ever so slightly distorted parts later on in the process means starting over from the beginning. Not fun at all.
Once sure of your output level, get your input level correct. Follow the same rules. Occasional peaks may be fine. You should definitely try a test recording or two when learning your sound cards meter accuracy. It is not uncommon, especially with built-in sound or inexpensive sound cards to have inaccurate metering. Listen carefully to the recordings for anything nasty. Digital distortion should be easier to hear than typical tape drive overload or the distortion on heavily distorted metal or grunge music, for example. Big Note: Cassette tapes are fragile and lose sound quality due to stretching, fraying, residues and all sorts of other reasons. Don't expect to be able to clean up this sort of thing. It isn't the fault of the sound card if the tape is messed up. Monitor the tape decks output if you suspect the tape is damaged.
OK, so now, presumably you are ready to record. Different software will use different procedures, but it's all pretty similar. First you "Arm" (set record check box to on, not hit the record transport button) on the tracks you want to record on. A single channel is often set to record in stereo - read the manual or help file for your software! Monitor the input levels to make sure you're levels are ok. Some high quality cassette decks have a RTZ (return to zero) button which is really helpful to set up starting the tape just before the song starts. Use it! You will want to Hit the record button on the software just before hitting "play" on the cassette deck. Stop recording when the song is done, or if you are recording a whole side at once, when the side is complete. Carefully monitor the results for distortion or noise levels. Repeat as needed.
More Info:
Zen And The Art Of Cassette Deck Maintenance
CONNECTING A TURNTABLE (PHONOGRAPH) TO YOUR COMPUTER
This is a very hot topic at the moment with the resurgence of Vinyl, plus all of those who want to transfer their records to their computers to burn to CD, or put on their MP3 players or Ipods.
The first thing you have to understand is that you cannot connect a turntable directly to your computer. Why? A phono cartridge puts out an extremely small signal, which has a rather strange frequency response curve (due to RIAA equalization). A phono preamp is required to boost the signal and "straighten out" the frequency response. This is why you must plug a turntable into the "phono" input of a receiver or preamplifier rather than the "Line" or Tape inputs. Besides that, there are different types of cartridges (the needle and cartridge create the electrical signal from the grooves). There are moving coil, moving magnet and ceramic cartridges, generally, which need different preamp settings, or possibly different preamps. Moving Magnet cartridges are the most common type, especially from 1970-current, while moving coil cartridges are often favored by audiophiles. Ceramic is the old, cheap cartridges used turntables you would not want anyway. An input on a receiver or preamp that does not specify is usually moving magnet ready. There are also high output moving coil cartridges that will work on moving magnet preamps. Yikes! Just a bit annoying? Well, there's always more - depending on how deep you want to go....
Impedance matching is another hot topic with cartridges and preamps. Frequency response of cartridges can be affected by output to input impedance interaction with preamps.
OK, that's deep enough; see the links below for more in-depth information.
More Info:
How to Clean LP Records
Tone arm Alignment for pivot tone arms
HOW TO MAKE THE CONNECTION:
You must connect the turntable to the Receiver preamp or dedicated phono preamp, and then connect the Tape output or other Preamp output of the receiver to the computer, using the computer as you would a tape deck. There are also separate phono Preamps you can buy, (some even have USB outputs) but they are not often inexpensive, such as a yard sale integrated amp or receiver would be. There's lot's of nice old stuff on ebay as well.
If your turntable has RCA Jacks, it should have a permanently attached cable which connects to the “phono” input of the Receiver. Going from the receiver/preamp to your computer, an RCA jack stereo cable which plugs into the "line" input of your computer’s sound card completes the circuit. Most computers have 3.5mm (1/8”) stereo mini jack inputs, so a Mini Jack to Dual RCA cable is what you would need to connect them.
Example Connection:
3.5mm (1/8") Stereo mini plug to dual RCA cable
Turntables with USB?!
If you want a Turntable that has a USB output that should make it very easy to connect, but many of these do not meet an audiophiles’ criterion for "good sound" and are not exactly cheap, either. If you have to go this route and are on a budget then you might want to look at some Audio Technica, Stanton and Numark Models. For those who want the best quality, get a quality model like the Pro-Ject Essential or stick with the non-USB models.
For a budget permanent Turntable to computer setup, use a dedicated preamp or good old receiver for best results.
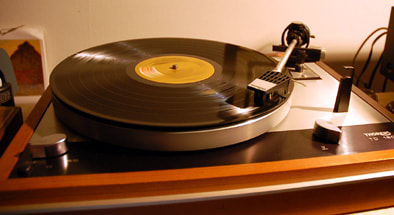
Good Turntable Brands for eBay? Thorens, Dual, Micro Seiki, Denon, and others can be had for decent prices. Receiver Brands? Denon, Yamaha, and about a zillion others if you go back in time far enough...
Cartridges? Shure M97xE , Denon DL-110 , Ortofon red or blue, or Grado black are all nice.
3.5mm (1/8") Stereo mini plug to dual RCA cable
Turntables with USB?!
If you want a Turntable that has a USB output that should make it very easy to connect, but many of these do not meet an audiophiles’ criterion for "good sound" and are not exactly cheap, either. If you have to go this route and are on a budget then you might want to look at some Audio Technica, Stanton and Numark Models. For those who want the best quality, get a quality model like the Pro-Ject Essential or stick with the non-USB models.
For a budget permanent Turntable to computer setup, use a dedicated preamp or good old receiver for best results.
Good Turntable Brands for eBay? Thorens, Dual, Micro Seiki, Denon, and others can be had for decent prices. Receiver Brands? Denon, Yamaha, and about a zillion others if you go back in time far enough...
Cartridges? Shure M97xE , Denon DL-110 , Ortofon red or blue, or Grado black are all nice.